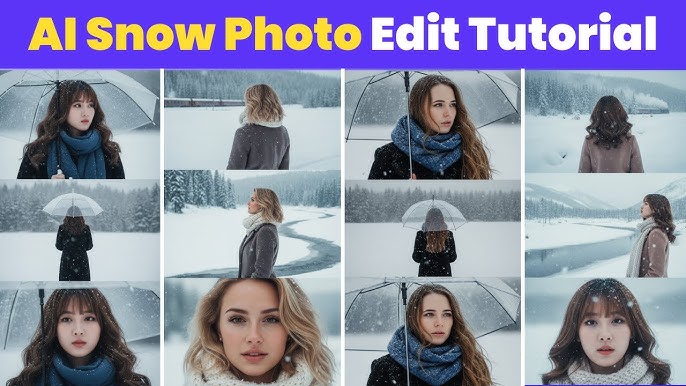
Winter is magical. The soft hush of falling snow, the crisp air, the serene landscapes — it all evokes a mood that many of us want to capture. Yet, not all of us live somewhere snowy, and photography conditions aren’t always perfect. That’s where AI comes in. With advances in image-editing tools and generative models, you can turn an ordinary photo into a realistic snow scene — complete with falling flakes, frosted light, and a cinematic winter atmosphere.
In this post we’ll cover everything you need to know: why you might want to create AI snow photos, what kinds of tools are available, how to do it step-by-step, and tips & tricks to make your results look truly believable. Whether you’re a casual social-media creator, a photographer, or a content marketer, this guide will help you master the technique.
Let’s dive in.
Why Create AI Snow Photos?
The appeal of winter visuals
Snow evokes strong feelings: nostalgia, calm, romance, quiet wonder. From holiday cards to social-media posts, snowy scenes get attention. Creating snow visuals can help set a mood, tell a story, or simply give your content a seasonal boost.
When real snow isn’t an option
Maybe you live in a tropical climate, or you didn’t plan ahead for a snow-shoot, or the weather turned out plain grey. In those cases, trying to produce a realistic snow scene via conventional photography can be time-consuming or impossible. AI tools let you simulate that environment with minimal effort.
Efficiency and versatility
Rather than scheduling a winter-shoot, lugging gear, battling cold, and waiting for good light, you can use AI tools to transform existing images. This means: faster production, more flexibility, and creative freedom. Some apps even let you animate the snow or change lighting to match the mood.
Trend & share-ability
There’s a growing trend on social media of “AI snow portraits” — people turning everyday pictures into cinematic winter scenes. For example, the tool YouCam Perfect has a tutorial showing how to create this effect. Also, apps like Meitu and BeautyPlus highlight the snow filter trend in their “AI Snow” features.
What Tools & Techniques Are Available?
There are broadly three ways to produce AI snow photos:
- Dedicated AI photo filters/apps – These are plug-and-play: upload your photo, pick a “snow” effect, and the tool automatically adds snow, lighting changes, background tweaks.
- Example: The site Fotor offers an “AI Snow Filter” where you just upload your photo, click “Generate” and get a winter version.
- Example: OpenArt offers a “Change Your Image to Winter Season” style‐transfer tool.
- Prompt-based generative AI workflows – These require a bit more work, but offer far more creative control. You upload your photo (or sometimes use a text-to-image tool) and then craft a prompt describing the snow scene you want. The AI then re-renders or edits the scene.
- Example: The article on Media.io shows how to use “Gemini AI snow prompts” for dramatic winter portraits.
- Manual photo-editing techniques – If you know tools like Adobe Photoshop you can manually add snow overlays, adjust lighting, blur, create custom layers. While not fully “AI” in the generative sense, these techniques give you fine-control for top quality results. Adobe’s tutorial covers adding noise, blurring, layering, blending.
Each approach has pros and cons. If you want speed, go with a simple app. If you want customization and quality, venture into prompt-based or manual editing.
Step-by-Step: Create Realistic AI Snow Photos
Here’s a detailed process you can follow—from choosing your base image, to applying the snow effect, to refining for realism.
Step 1: Choose the Right Base Photo
Before you apply a snow effect, the starting image matters a lot. A good base helps the AI or editing tool do a more believable job.
What to look for / what to aim for:
- Good resolution and clarity. Low-quality or blurry images reduce realism.
- Clean composition and simple backgrounds. Too many distractions make it harder for AI to convincingly overlay snow.
- Soft lighting — avoid harsh midday sunlight or strong shadows, unless that’s part of your mood. Soft, diffuse light helps when adding snow and frosty tones.
- A subject or scene that complements the winter mood — e.g., someone wearing a coat or scarf, or a landscape with bare trees or open sky.
- Enough “negative space” (areas of less detail) so the snow overlay stands out and the effect isn’t cramped.
As one app blog notes: “Even though AI can add the snow, your original photo still matters.”
Step 2: Decide on Your Style & Mood
“Snow” doesn’t mean just white flakes. Consider what kind of winter vibe you want:
- Light & magical: Gentle snowfall, soft glow, pastel tones.
- Stormy / heavy snow: Dense flakes, maybe wind, more contrast, moody.
- Holiday/cozy: Snow plus warm lights, maybe a golden hour tone or festive accents.
- Cinematic / dramatic: Strong lighting contrast, deep shadows, color grade to blue tones, maybe desert snow aesthetic.
Also decide: Will you change the background? Will you turn daytime into dusk? Will you incorporate props (umbrella, hat, scarf), or text overlays?
Step 3: Use AI Tool / Prompt to Add Snow
Now the fun part: applying the effect. Let’s cover two workflows: a “quick filter” method and a “prompt-driven” method.
Method A: Quick Filter / App
- Upload your photo into the app (e.g., Fotor, OpenArt, YouCam Perfect)
- Select the “snow” or “winter”, “snowfall” effect.
- Adjust strength if the app allows. Many tools let you tweak how intense the effect is. Fotor’s tool explains you can adjust “style strength”.
- Preview and, if available, manually tweak: maybe reposition snow overlay, adjust lighting, tweak color grade.
- Download the result in high resolution.
Method B: Prompt-Driven Generative AI
This gives more control but requires you to craft a good prompt. For example, from the Media.io article:
“Create a vertical 9:16 cinematic composite of me in the winter snow, split into three stacked frames… Top: a close-up of my eye and cheek, with snowflakes on my lashes… Lighting: soft daylight, HDR tone…”
Here’s a simplified workflow:
- Upload your photo (if using “image-to-image” mode) or start with photo + prompt.
- Write a detailed prompt specifying: scene (portrait, landscape), snow type (light flurry vs heavy), lighting (soft daylight, golden hour, twilight), mood, composition (close-up, full body, wide shot), color palette (cool blues, warm golds), any props/clothing/outfit.
- (Optional) Provide negative prompts: what you don’t want (e.g., “no cartoons, no hats, no oversaturated colours”).
- Generate the image. If the result isn’t perfect, refine your prompt or run again.
- Download the high-res result.
Step 4: Refine & Polish for Realism
Once you have your generated/edited image, a few finishing touches can make the difference between “okay” and “wow”.
Refinement tips:
- Check snow layering and depth: Real snow has depth variation — some flakes are close-to-camera, some far. Ensure the overlay doesn’t look flat.
- Lighting coherence: Snow scenes often have diffused light, maybe a bluish tint or cold tone. Make sure the lighting in your subject matches the background. If the background is warm golden, but your subject is lit harshly midday, it will feel off.
- Color grading: A slight cool tint (blue shadows), gentle contrast, maybe a bit of haze/fog can help.
- Edge details: Hair, eyelashes, scarf fibers — these pick up snow. Subtle snow on shoulders, on a hat rim or coat hood can help authenticity.
- Shadowing & interaction: If snow is falling, maybe a slight drop shadow or blur on nearer flakes, or motion blur on falling flakes, can enhance realism. In the Photoshop tutorial, they suggest using Motion Blur after adding the noise layer.
- Background integration: If you replaced the background, check colour temperature, contrast, and make sure subject isn’t “cut-out” without ambient integration.
- Resolution / clarity: Ensure your final image is sharp enough, especially if you plan to share on social media or print.
- Export settings: Save in high resolution, use formats like PNG or high-quality JPG, maintain color profile (sRGB) for web.
Step 5: Share & Use Your Snow Photo
Once your image is ready, think about how you’ll use it:
- Social media: Use Instagram stories, reels, feed posts with hashtags like #AISnow, #WinterPortrait, #SnowFilter.
- Seasonal content: Use for holiday cards, blog featured images, winter-themed campaigns.
- Print: If you’re printing, ensure color profile and resolution are print-ready.
- Animation: Some tools allow turning the static image into a short clip of falling snow or animated snowfall — this can increase engagement.
SEO Keywords to Include (for your blog)
Since you asked for an SEO-friendly blog post, here are some keywords you’ll want to sprinkle naturally:
- AI snow photo
- Create snow photos with AI
- AI snow filter
- Add snow effect to photo
- Realistic AI snow scene
- Winter photo editing with AI
- AI snow portrait tutorial
- Snow effect photo editor
- AI snow background generator
Try to include them in headings, sub-headings, meta-title, meta-description, and body text (but naturally — don’t stuff!) to optimize for search.
Common Mistakes & How to Avoid Them
Here are pitfalls many people fall into — and how you can avoid them.
- Too heavy snow overlay: If snow flakes are too large or dense, the scene looks overdone or fake. Use subtle variation.
- Mismatch in lighting/colour: If your subject is lit naturally but the background is dark and stormy (or vice versa) the disconnect is obvious.
- Flat composition: Snow is in motion, and real snow scenes have depth. Without that, the effect becomes a flat filter rather than a believable environment.
- Ignoring subject clothing/context: A summer outfit in a heavy snow scene looks odd. Make sure subject and scene match.
- Low resolution result: Many AI tools down-scale or compress images. Always check output resolution and quality.
- Overlooking post-processing: AI gets you most of the way, but small manual tweaks (colour grade, blur adjustments, selective masking) elevate the result.
Prompt:
The character walks alone through a snowy open field, the belted coat flowing slightly with the wind. They look upward catching snowflakes with their hand. The camera angle is slightly elevated, showing their small figure against the vast white world. A few bare trees stand in the distance, adding to the calm emptiness.Image 3 (close-up): A close-up of the face, showing the gentle sadness in the eyes but not zoomed in too tightly the framing captures the upper face and soft expression, with snowflakes melting on the hair and eyelashes. The mood feels lonely, nostalgic, and tender.
Prompt 1:
The character strolls slowly along a frozen riverbank, their scarf trailing behind them in the breeze. Snow gently falls around, settling on the edges of their hood and shoulders. The camera captures a wide shot from slightly above, showing the frozen river curving through the snowy landscape. Sparse reeds poke through the ice, adding texture to the serene winter scene.Close-up: A soft focus on the character’s eyes as they watch snowflakes land on their eyelashes. The expression is pensive, almost dreamlike, with a faint blush on the cheeks from the cold. Snow clings to the strands of hair, and the light is soft and diffused, enhancing the quiet, reflective mood.
Prompt 2:
The character walks along a snow-covered forest path, footprints trailing behind them. Their coat flutters as they turn their head to look at the snow-laden branches above. The camera angle is from a slightly low perspective, capturing the towering trees and the depth of the forest blanketed in snow. Light filters through the bare branches, creating gentle shadows on the snow.Close-up: The character’s face is partially obscured by a scarf, with only the eyes visible, gazing thoughtfully at a falling snowflake. Snow gathers on the lashes and soft strands of hair, giving a sense of fragile stillness. The mood is quiet, contemplative, and bittersweet.
Prompt 3:
The character stands at the edge of a frozen lake, the wind catching the hem of their coat. Snow swirls around their feet, and distant mountains are barely visible through the soft snowfall. The camera angle is slightly elevated, showing the character as a small figure against the vast icy expanse, emphasizing isolation and peaceful solitude. Close-up: Focus on the character’s profile, with snow resting lightly on their eyelashes and hair. Their lips are slightly parted as if whispering to the wind. The scene radiates gentle melancholy, nostalgia, and a delicate connection to the winter world.
Advanced Tips & Creative Ideas
Once you’ve mastered the basics, here are some advanced ideas to level up:
- Composite multi-layer snow: Use several snow overlays at different scales and opacities to mimic complex snow fall (heavy near camera, light farther away).
- Motion blur for falling snow: Add slight vertical or diagonal blur on snow layers to simulate motion.
- Use colour contrast: Pair the cool blue tones of snow with warm accent lights (street lamps, golden hour sun, warm coat) for a cinematic look.
- Add frost or ice textures: Consider adding a soft frost on windows, or ice crystals on subject’s hair/coat for extra realism.
- Use depth of field / bokeh: A shallow depth of field helps draw attention to subject and makes snow in foreground/background look more believable.
- Sequence / story frames: Create a series of images (before snow, mid snow, heavy snow) to tell a narrative.
- Animate: Turn your snow photo into a short clip where snow gently falls, ambient blur changes, and light shifts. This is especially engaging for Reels or TikTok.
- Use snow in product photography or landscapes: Don’t limit to portraits — you can apply snow effects to objects, landscapes, buildings, seasonal ads. For instance, the style-transfer tool in OpenArt lets you convert any image into a winter scene.
Case Study Example
Let’s walk through a fictional but practical example to illustrate the workflow.
Scenario: You have a portrait photo of a friend taken on a city street in autumn. You want to turn it into a winter snow scene for a holiday card.
- Base Photo Selection: The original photo shows the friend in a coat, with soft late-afternoon lighting. The background has some buildings and trees, leaves still present. Used resolution: 4000×3000 px.
- Decide on Style: You want a cinematic “first snow of the season” vibe — gentle big flakes, city street, warm lamplight and cold ambient.
- Tool Choice & Prompt: You choose an image-to-image AI tool (Media.io / Gemini prompts).
- Prompt: “Full-body urban portrait of woman standing on a city sidewalk at dusk, light snowfall, soft golden street lamp in background, cool winter light ambient, snowflakes gently falling, shallow depth of field, bokeh lights, natural pose, wearing navy wool coat and grey scarf.”
- Negative prompt: “no harsh shadows, no snow-covered hat, no cartoon, no oversaturated colours.”
- Generate & Review: After a few tries you get a version you like: snow is present, background changed to bare trees and lamppost glow, lighting is consistent.
- Refine Manually: In Photoshop you add:
- Motion blur to the top layer of snow for sense of falling.
- Minor colour grade: increased blue in shadows, slight warm highlight on lamplight.
- Added small snowflakes on coat shoulders and scarf.
- Export & Use: Save at 3000×2250 px, sRGB, high quality JPG. Upload as holiday card image and share on Instagram with caption “Winter magic ❄️”.
Wrap-Up & Key Takeaways
- AI snow photo creation is a powerful, accessible way to transform ordinary photos into cinematic winter scenes.
- Choose a good base photo (clear image, suitable lighting, subject/clothing consistent).
- Decide on your style and mood before applying effects — gentle/romantic vs heavy/dramatic.
- Use either quick filter apps or prompt-based generative AI depending on your comfort and needed control.
- Refine the result with manual adjustments for lighting, layering, depth, and details.
- Avoid overdoing it: realism often comes from subtlety, coherence, and small additional touches.
- Use the right keywords if you’re blogging about it (AI snow photo, snow effect, winter photo editing, etc) to boost SEO.
- Experiment! Try different prompts, backgrounds, clothing styles, snow densities, and share your results.
For More Information Visit


