AI Profile Picture And Your profile picture is often the first impression you make online—on LinkedIn, Twitter, Instagram, Discord, or any other platform. In the age of AI creativity, you don’t need to hire a photographer or graphic designer to have a standout profile image. With low-cost tools and smart prompt writing, AI-generated profile pictures are accessible, customizable, and professional.
This post guides you step-by-step—covering choice of style, tools, prompt engineering, editing, SEO best practices, and more—so that by the end, you can confidently publish your new AI profile picture and your digital platform or website will also rank higher thanks to SEO enhancements.
2. Why Use AI-Generated Profile Pictures
1. Professional & Polished
AI tools can create studio-quality lighting, flattering poses, and clean backgrounds, even if you’re using your smartphone photo.
2. Customizable to Your Brand
Whether you want a cartoon avatar, futuristic sci-fi look, or corporate sharpness, AI can adapt.
3. Cost-Effective & Fast
No expensive photoshoots—generate in minutes for a fraction of the cost.
4. Privacy-Friendly
Stay anonymous or stylized without revealing your real face.
5. Stand Out on Social Platforms
An eye-catching AI avatar attracts more engagement, follows, and clicks.
3. Ethical & Legal Considerations
Before generating an AI image of yourself, consider:
-
Use Your Own Likeness: Avoid uploading images of others without permission.
-
Stay Transparent: Label your AI image as “AI-generated” when using on public or professional sites.
-
Follow Platform Rules: Avoid deepfake-style images or misleading visuals.
-
Check AI Tool Policies: Ensure the AI model allows personal use of generated images.
By keeping your approach fair, respectful, and transparent, you avoid ethical pitfalls and potential violations.
4. Tools You’ll Need
A. AI Image Generators
-
Stable Diffusion: Highly customizable, excellent results, works offline.
-
Midjourney: Fun Discord-based tool, great stylization.
-
DALL·E 3: Sharp, reliable output via OpenAI’s web portal.
-
Avatar-Specific Tools: Apps like Lensa, Fotor, and Toongineer make avatar creation easy.
B. Prompting & Finetuning Tools
-
Automatic1111 or InvokeAI: Offer inpainting, upscaling.
-
DreamBooth / LoRA: For personalized training based on your face.
-
ComfyUI: Visual pipeline tool for advanced users.
C. Image Editors
-
Photoshop (paid) or GIMP (free) for final polish—cropping, color balance, sharpening.
D. Optional: Style Assets
-
Background textures, animated overlays, and small accents to enhance the final image.
5. Step 1: Choose Your Style & Concept
Before diving in, decide your aesthetic:
-
Professional Headshot: Clean background, natural lighting, smart attire. Ideal for LinkedIn or resumes.
-
Cartoon/Illustration Avatar: Pixel art, hand-drawn, or stylized portrait. Perfect for Twitch, gaming, or creative blogs.
-
Themed Concept: Superhero, sci-fi warrior, medieval fantasy, retro ’80s—you name it.
-
Abstract/Artistic: Colorful, dreamy, surreal—shows personality and creativity.
Having a clear vision helps guide your tool, prompt choices, and editing.
6. Step 2: Select the Right AI Tool
Tool Comparison
| Tool | Style Output | Ease of Use | Customization |
|---|---|---|---|
| Stable Diffusion | Photoreal & artistic | Medium (requires setup) | High – finetune, LoRA, prompt tweak |
| Midjourney | Stylized & expressive | Very easy (Discord bot) | Moderate – rely on prompt phrasing |
| DALL·E 3 | Clean & balanced | Easy (web interface) | Low – limited custom control |
| Avatar tools (Fotor etc.) | Cartoon / fun styles | Very easy (mobile/web app) | Low – template-driven |
Recommendation: If you want full creative control and quality output, go for Stable Diffusion. If you want quick, stylized results, Midjourney is excellent. For beginners, avatar apps are easiest.
7. Step 3: Prepare Your Reference Images
If using your own face:
-
Upload 3–5 high-quality images with different angles and natural lighting.
-
Make sure your face is clearly visible, without shadows.
-
Export at least 1024×1024 px in high quality (PNG or JPEG).
For stylized avatars (cartoon/fantasy), images aren’t mandatory—but personal photos give the model a better likeness base.
8. Step 4: Craft Strong Prompts
An effective prompt includes subject, style, details, lighting, and camera language.
Prompt Tips:
-
Include subject gender/age/ethnicity for realism.
-
Add resolution tags like “8K” or “ultra-detailed.”
-
Specify mood or emotion, e.g., confident, friendly, mysterious.
-
Use camera terms: “close-up,” “medium shot,” “portrait.”
-
Use negative prompts: “no blur, no watermark, no unrealistic skin.”
9. Step 5: Generate the AI Profile Picture
A. Using Stable Diffusion
-
Load your model and reference images.
-
Enter your well-crafted prompt.
-
Use 20–50 diffusion steps, CFG 7–9.
-
Generate multiple variations (5–10).
-
Save your favorite candidates.
B. Using Midjourney
-
Use
/imagineprompt in Discord. -
Generate 4 grids per prompt.
-
Choose a result → click V1–V4 to upscale.
-
Save high-res image for editing.
C. Using DALL·E 3
-
Submit your prompt via OpenAI’s platform.
-
Generate 4 images.
-
Select best variant → click Download.
D. Mobile/Web Avatar Tools
-
Upload images.
-
Choose style/settings.
-
Generate and download.
10. Step 6: Refine & Select the Best Output
Evaluate your images:
-
Likeness: Does it look like you?
-
Lighting & Clarity: Sharp, well-lit?
-
Background: Clean and distraction-free?
-
Artistic Style: Matches your concept?
-
Artifacts: No glitches like extra limbs or warped features.
Keep your top 2–3 images and discard others.
If none are good enough, tweak the prompt, adjust negative prompts, or try a different AI engine.
11. Step 7: Post-Processing & Editing
Even strong AI avatars benefit from small edits:
-
Crop & Align—make head centered.
-
Color-Correct—using curves, brightness/contrast.
-
Sharpen & Smooth—use High Pass or Unsharp Mask for crispness.
-
Remove Imperfections—spot healing for glitches.
-
Background Clean-Up—remove distractions or unwanted textures.
-
Add Branding—subtle logo, color background that matches your brand theme.
-
Resize and Export:
-
Social media sizes: 400×400 px (Twitter), 800×800 px (Instagram).
-
Export as PNG or JPEG (80–90% quality).
-
12. Step 8: Export, Optimize & Share
Before uploading:
-
Rename file descriptively:
ai-profile-picture-jane-doe-2025.jpg -
Add Alt Text: “AI-generated professional profile picture of Jane Doe with studio lighting.”
-
Resize for platforms:
-
LinkedIn: 400×400 px
-
Instagram/Twitter: 800×800 px
-
Discord: 512×512 px
-
Pro tip: Use the same image across your web presence—LinkedIn, website, newsletter—to build brand recognition.
13. SEO Best Practices for Your Blog Post
Your blog post showcasing the “How to Make an AI Profile Picture” process can rank higher with proper SEO:
-
Primary Keywords: “AI profile picture,” “AI avatar maker,” “create AI profile photo”
-
Secondary Keywords: “AI portrait generator,” “AI LinkedIn profile pic tutorial”
-
Use keywords in:
-
Title (H1), first 50 words, and subheadings (H2/H3)
-
Alt text of process images/screenshots
-
Metadata (meta title and meta description):
-
Meta Title Example: “How to Create an AI Profile Picture | Step-by-Step Guide”
-
Meta Description: “Learn to generate a professional AI profile picture in minutes—tool comparison, prompt writing, editing tips, and SEO best practices.”
-
-
-
Use Internal & External Links:
-
Reference AI tool guides (link to Automatic1111, Midjourney docs).
-
Link to related content on your site (branding, tutorials).
-
-
Add Structured Data — Use HowTo schema:
This can help your blog appear as a rich snippet.
-
Use Clear Visuals:
-
Screenshots of steps
-
Before/after comparison
-
Process GIFs where applicable
-
14. Troubleshooting Common Issues
-
Generations lack likeness:
-
Use DreamBooth/LoRA finetuning.
-
Include negatives like “unrealistic facial features.”
-
-
Background too busy:
-
Add “plain background” to prompt.
-
Use editor to blur or replace background.
-
-
Low resolution output:
-
Use “8K” or upscale features.
-
Apply AI upscalers like Real-ESRGAN.
-
-
Artifacts & glitches:
-
Use inpainting to repair.
-
Regenerate with different seed or CFG settings.
-
Image Prompt:
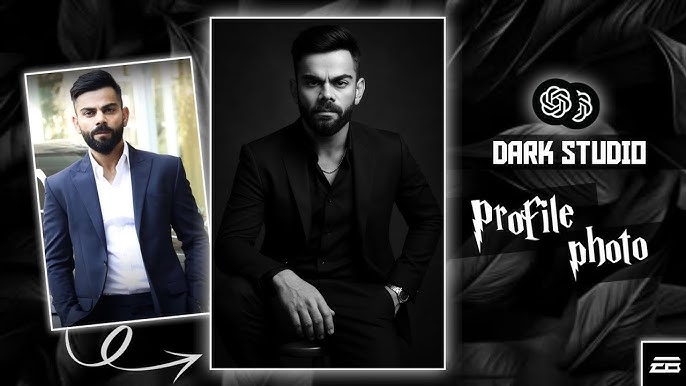
“Modern style poster design featuring an east Asian Korean white skin man wearing a light brown suit, with a split personality concept. On the front, a colorful version is shown.The man with korean hair style black color, skin color is white. The man 18s, weight 50kg and hight 5’4”.The man is wearing a modern light [brown blazer,] a white shirt,”Modern style poster design featuring an east Asian Korean white skin man wearing a light brown suit, with a split personality concept. On the front, a colorful version is shown.The man with korean hair style black color, skin color is white. The man 18s, weight and air force 1 black.The pose is walking slowly towards the camera or slightly away, with his head turned to the camera. The blazer is left open, and one hand can be playing with a watch. Impression: Dynamic, modern, classy, and professional. In the background, a black-and-white version of himis seen wearing sunglasses, staring intentlyahead with a mysterious expression. In thebackground, a black-and-white version of him is seen wearing sunglasses, staring intentlyahead with a mysterious expression. The background is light gray with a dramatic light[brown] circle or gradient element behind the main figure. Studio design, bold lighting, symmetrical composition. Ultra HD 8K, hyper realistic, and Detail. Style Editorial fashion, men’s lifestyle campaign.
15. Conclusion
Creating a standout AI profile picture is easier than ever—with the rise of powerful image generators and strong prompt techniques. A polished AI portrait can elevate your personal brand, make your social media profiles pop, and help you stand out in a digital crowd.
Quick recap:
-
Choose your style & tool.
-
Prepare great reference images.
-
Write clear prompts.
-
Generate multiple variants.
-
Edit & refine carefully.
-
Export optimized, SEO-ready images.
Next steps:
-
Try a mini-project: generate 5 variants, refine in an editor, and publish one.
-
Write a case study or testimonial—show your process (good for traffic).
-
Keep learning—prompt styles and tools evolve fast.
Engage your readers:
Let me know which tool you tried and how your new AI profile picture turned out! Share screenshots or tag me on social media—I’d love to see your creativity shine in digital form.
For more Information Visit Puletech