Free Fire is wildly popular: the characters, the gear, the action — they make for visually striking imagery. Turning a Free Fire character (or your avatar) into a “figurine photo” blends gaming art, AI, and design for a unique digital collectible look. This tutorial walks you through all the steps: planning, tools, execution, tips, and legal/ethical aspects.
Table of Contents
-
What is a “figurine photo” and why it’s trending
-
Key concepts: AI image generation, prompts, style
-
Tools & platforms you can use
-
Step-by-step workflow: From idea to final image
-
Prompt engineering for Free Fire style
-
Composition, lighting & environment tips
-
Editing & polish: post-processing
-
Alternative methods (if you want physical figure, or 3D printable model)
-
Legal, ethical & copyright considerations
-
Optimization for sharing / SEO & social media
-
Common pitfalls & how to avoid them
-
Conclusion
1. What is a “Figurine Photo” & Why It’s Trending
A figurine photo (in this context) means creating a digital image that looks as though the subject (a Free Fire character or avatar) is a collectible figurine or action-figure: posed, with a base or stand, maybe with packaging or display props. It mimics product photos or toy displays.
Why people love it:
-
Visual novelty: It gives a “real object” feel to a virtual/fantasy character, which attracts attention.
-
Personalization: Gamers love to see their character or themselves in this style.
-
Social media friendly: These images get high engagement; they look professional.
-
AI tools are now accessible: Many tools let you do this without 3D modeling skills or large budgets.
2. Key Concepts: AI Image Generation, Prompts, Style
Before you start, understanding some terms:
-
AI image generation: Using models (like Stable Diffusion, DALL·E, Midjourney, or newer ones like Google Gemini) that interpret text prompts (and optionally image inputs) to produce visuals.
-
Prompt engineering: The art of writing detailed, precise descriptions (“prompts”) which guide the AI to produce the style, lighting, pose, and look you want.
-
Reference images: If the AI supports image input, giving a good reference (your Free Fire character, outfit, gear) helps.
-
Style: Realistic, stylized, chibi, toy-like, hyper-detailed, etc. Decide upfront what kind of figurine style you’re going for.
-
Resolution & aspect ratio: Higher resolution gives better detail; 1:1 or 4:5 works well for Instagram etc., landscape for banners, etc.
3. Tools & Platforms You Can Use
Here are some tools and platforms, with their pros & cons:
| Tool / Platform | What it offers | Advantages | Limitations |
|---|---|---|---|
| Google Gemini 2.5 / “Nano Banana” | A tool to generate 3D figurine-like images from prompt + image. You can produce realistic figurine renders. The Times of India+2Perfect Corp.+2 | Free, accessible, fast; good for high quality imagery. | Sometimes details (pose, hands, small gear) may get distorted; need precise prompt; watermarks or SynthID may be applied. |
| Stable Diffusion / Midjourney / DALL·E | More customizable prompts; many styles. | You can tune parameters; use community models; more control. | Might require tweaking; possible cost; output may require multiple versions. |
| Photo editing tools (Photoshop, GIMP) | For touch-ups, compositing, adjusting colours, shadows, etc. | Helps polish the final image. | Learning curve, time involved. |
| 3D modeling tools (Blender, etc.) | If you want to go real 3D, pose, render with precise lighting. | Maximum control; possible to print or produce turntables. | Steep learning curve; time-consuming; may require skills. |
In this guide we’ll focus on tools that are accessible even to non-experts, especially using AI + prompt + image input.
4. Step-by-Step Workflow: From Idea to Final Image
Here’s a detailed workflow:
Step A: Planning & Gathering References
-
Choose the Free Fire character (or your avatar) you want to figurine-ize. Collect high quality reference images: full body, outfit, gear, key pose.
-
Decide on the figurine style:
-
Material: plastic? vinyl? metallic highlights?
-
Finish: matte, gloss, semi-gloss.
-
Scale: 1/7 scale, 1/6, etc.
-
Base / stand: transparent acrylic? wooden base? themed base?
-
-
Define the environment / props: Will the figure sit on a desk? In packaging? With toy box? With display lighting? With background studio lighting or dramatic lighting?
-
Think about lighting direction, shadows, reflections. These greatly affect realism.
Step B: Choosing & Preparing the Tools
-
Select your AI tool (e.g. Gemini / Nano Banana) that can accept image input (if you want your Free Fire character image as reference).
-
Prepare the reference image:
-
Clear image of character (no heavy background distractions).
-
Good lighting in original photo.
-
Pose that shows the character well.
-
-
If needed, clean up the image (crop, remove background) using image editors so prompt focus is clear.
Step C: Writing the Prompt
This is critical. A detailed, precise prompt can make a big difference.
Elements to include in the prompt:
-
Subject: “Free Fire character X” or “free fire avatar wearing Y clothes / gear / skin”
-
Figurine style: “realistic figurine”, “collectible toy”, “action figure”, “vinyl figure”, etc.
-
Scale: “1/6 scale”, “1/7 scale” etc.
-
Base / stand: “on a round transparent acrylic base”, or “wooden base”, or “magnetic base”, etc.
-
Pose: “standing heroically”, “crossed arms”, “in shooting pose”, etc.
-
Environment / lighting: “studio lighting”, “soft shadows”, “rim light”, “spotlight”, “natural window light”, etc.
-
Additional props: “packaging box in style of premium collectible with original artwork”, “monitor showing 3D modeling process”, etc.
-
Detailing: “fine details”, “gear textures”, “metallic highlights”, “cloth wrinkles”, etc.
Example Prompt:
“Create a 1/6 scale collectible figurine of the Free Fire character ‘DJ Alok’ wearing his signature costume. The figurine is in a dynamic firing pose, placed on a round transparent acrylic base. Studio lighting with soft shadows, rim light from behind. Next to it, display a toy packaging box with custom Free Fire artwork. Realistic textures showing cloth, leather, metallic gear; no background distractions; high detail.”
Step D: Generating the Image
-
Upload your reference image (if tool allows) + enter your prompt.
-
Generate the first versions. Review them:
-
Is pose correct?
-
Textures looking realistic?
-
Base looking good?
-
Lighting & shadows consistent?
-
-
If something is off, adjust prompt. Maybe specify things more precisely (“strong rim light”, “shadow under feet”, “no distortion in hands”, etc.).
-
Possibly try multiple versions, changing small prompt bits: pose, angle, lighting.
Step E: Post-Processing & Editing
Once you have a generated image you like:
-
Use an image editor (Photoshop, GIMP, Affinity Photo etc.) to polish:
-
Retouch artifacts (if AI messed up hands, face etc.).
-
Adjust colours, contrast, saturation.
-
Add reflections/shadows to base to anchor figurine to surface.
-
Sharpen small details.
-
-
If you want packaging or background, you might composite separate images: e.g. mock-up packaging box, display shelf, logo overlays.
-
Resize & ensure resolution is good for your intended platform (social media, printing, desktop wallpaper etc.).
5. Prompt Engineering for Free Fire Style
Since Free Fire has a specific style (vibrant, dynamic, gear/skins, often futuristic or edgy), your prompt needs to reflect that. Here are tips:
-
Include the name of the skin/gear: “Night Panther skin”, “DJ Alok costume”, “Chrono suit”, etc.
-
Mention colours: “neon Blue accents”, “golden trim”, “glowing eyes”, etc.
-
Action or dynamic pose: Free Fire is action; a static figurine is okay, but dynamic posture adds drama.
-
Weapon & gear details: If holding a gun, melee weapon, backpack — describe it.
-
Special effects: Lighting, glow, particles, smoke if appropriate (but not too much if you want realistic).
Here’s a refined prompt example for Free Fire style:
“Free Fire character ‘Chrono’ in his Chrono suit, in 1/7 scale collectible figurine style. Pose: mid-step with fists raised, holding the signature weapon. Figurine stands on transparent acrylic base with LED light glow beneath. Realistic materials: metallic armor panels, cloth folds, glowing effects. Studio lighting with dramatic shadows. Include a custom packaging box in Free Fire aesthetic with logo and skin art.”
6. Composition, Lighting & Environment Tips
To make the figurine photo believable and appealing:
-
Use three-point lighting: key light, fill light, rim/back light to separate figure from background.
-
Light direction matters: rim light helps bring out edges. Soft shadows add realism.
-
Background: neutral, simple, studio style (grey, gradient) or a themed environment if you want more drama.
-
Reflection and shadows: ground shadows, perhaps a reflection on base, help the figure feel grounded.
-
Depth of field: slight blur in background can focus attention on the figure.
7. Editing & Polish: Post-Processing
After generation, editing can lift the image from “good to great”:
-
Clean up mistakes: AI sometimes misrenders hands, fingers, small accessories.
-
Add texture emphasis: highlight metallic shine, fabric weave, etc.
-
Colour correction: ensure the colours in the figurine match what you want.
-
Contrast & sharpness: bring out edges.
-
Add finishing touches: lens flares, vignette, glow if appropriate.
-
If packaging is included, ensure the artwork aligns, the box looks realistic (shadows, folds etc.).
8. Alternative Methods
If you want to go beyond flat 2D image:
-
3D model generation: There are AI tools that turn images into 3D assets which you can then render, pose, animate. If you have 3D skills, you can export and render with your own lighting for more control.
-
3D printing: Once you have a good 3D model, you could (if permitted) print a physical figurine. But that involves modelling, post-processing, selecting materials, etc.
-
Mixed reality / AR display: Some apps allow showing the figurine in AR; you could capture a photo or video with that.
9. Legal, Ethical & Copyright Considerations
Since you’re using a Free Fire character (which is IP owned by Garena) or using skins, logos, etc.:
-
Copyright / IP rights: Free Fire assets (characters, skins, official designs) are copyrighted. If you’re doing this for personal/fun use, usually fine. If for commercial sale, you need permission.
-
Using AI tools & likeness: If using reference images (especially fan art, or other people), ensure you have rights or use your own.
-
AI tool licenses & usage terms: Some AI tools add a watermark or require attribution; check the terms.
-
Community standards: If posting online, be transparent if AI-generated. Avoid misleading content or deep fakes.
10. Optimization for Sharing / SEO & Social Media
To make your figurine photos discoverable and sharable:
-
Use good filenames and alt texts: e.g. “Free Fire figurine DJ Alok 1-6 scale”, “Free Fire AI figurine tutorial”.
-
Use relevant keywords in your post titles & captions: “Free Fire figurine photo”, “AI Free Fire character collectible style”, “Free Fire skin figurine image”.
-
Use hashtags on social media: #FreeFire #AIArt #Figurine #GamingArt #Collectibles
-
Post across platforms: Instagram, TikTok, Pinterest, gaming forums; adapt size/aspect ratio.
-
If writing a blog post, include keywords in headings, meta description, image alt tags.
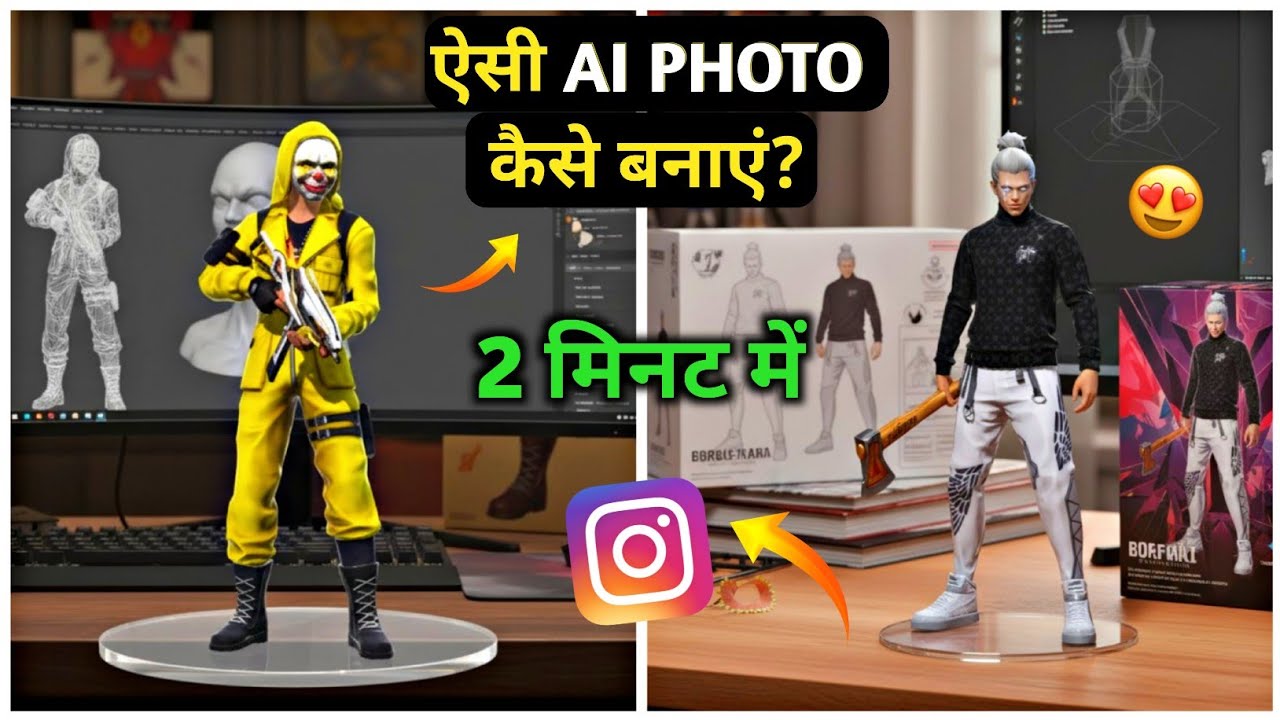
Prompt: “Create a hyper-realistic 1/7 scale figurine of the person in the uploaded Free Fire photo. The figurine should be seated in a relaxed pose on a throne-like chair, with one leg crossed and one hand resting on the side of the face. Add a flowing red cape draped behind the character for a dramatic effect. Place the figurine on a transparent acrylic base, displayed on a desk with a keyboard and monitor in the background. On the monitor, show a 3D model of the same pose, and on the side place a character box featuring artwork of the figurine. The style should be cinematic, premium collectible figure design with detailed textures, vivid colors, and polished lighting.”
11. Common Pitfalls & How to Avoid Them
| Pitfall | How to Avoid |
|---|---|
| Distorted anatomy, messed-up hands/weapons | Use detailed prompts; inspect generated images; maybe use reference image of pose; iterate multiple versions. |
| Overcrowded background / distractions | Keep backgrounds clean; specify “no background distractions” or “studio-style background”. |
| Unrealistic lighting or shadows | Mention lighting style, shadows; sometimes composite lighting manually if AI output lacks consistency. |
| Blurry textures or poor resolution | Use high resolution settings; upscale if needed; add sharpening in post. |
| Too generic look, lack of character identity | Include gear, skin, color, pose specific to the Free Fire character; incorporate game-specific elements. |
12. Conclusion
Transforming a Free Fire character into a collectible figurine-style AI image is a fun and creative way to blend gaming, art, and technology. With good planning (references, style, pose), careful prompt engineering, choosing the right tool, and polishing via post-editing, you can produce images that stand out.
Whether for personal use, sharing on social media, or simply exploring your creativity, this process can be very rewarding. And as AI tools evolve, possibilities will only increase.
For More Information Visit