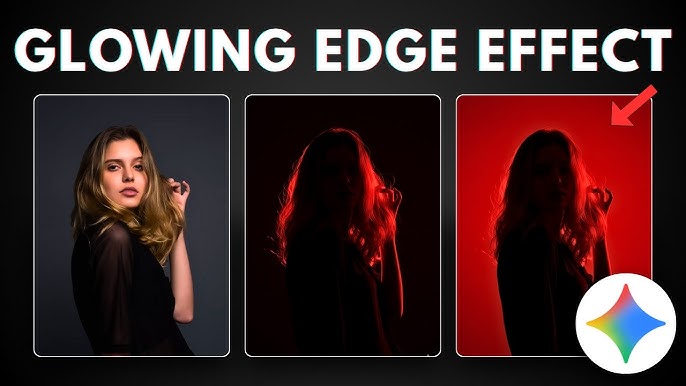
In the era of AI‐powered creativity, one of the most visually striking effects you can create is a fiery glowing shape — think arcs, flames, energy forms, ethereal lights — seamlessly integrated into portraits or scenes. These glowing forms lend a magical, cinematic aesthetic to your photos, making them stand out on social media, portfolios, or personal art projects.
In this guide, you will learn end to end how to plan, generate, and composite fiery glowing shape photos using AI tools and traditional editing software. Whether you’re a photographer, digital artist, or just experimenting, by the end you’ll have a strong workflow and multiple techniques to produce stunning, ethereal results.
2. Why Fiery Glowing Shapes Are Popular
Before diving into techniques, it helps to understand why this style has become so popular:
- Emotive and cinematic — Glowing forms evoke energy, magic, power — they carry emotional weight.
- Low barrier to creativity — AI and editing tools let creators generate complex light effects without needing hand‐painting skills.
- Engagement driver — On platforms like Instagram, ArtStation, and DeviantArt, magical or surreal effects attract more views and shares.
- Versatility — You can adapt glowing elements to portraits, fantasy, sci-fi, abstract art, double exposures, and more.
Because of these advantages, many creators are exploring “light magic” aesthetics — glowing orbs, energy wings, fire vines — and glowing shape photos are a core variant.
3. Concept & Planning
Define your vision
Before you start, sketch (even roughly) what you want to achieve. Ask:
- Where will the glow originate (hand, object, background)?
- What shape or style do you want (flame, smoke, electrical arcs, abstract swirls)?
- How strong or subtle should the glow be?
- What’s the mood — warm, cool, dramatic, mystical?
Choose the subject & environment
- Use a high-resolution subject photo with clear separation from the background (less clutter makes compositing easier).
- Lighting in the original photo should have predictability — ideally, directional light or shadows you can work with.
- Consider the background: simple or neutral backgrounds allow your glowing shape to stand out.
Decide constraints & style
- Do you want a fully realistic “light creature,” or more abstract energy lines?
- How much integration do you want (should the glow cast light on surroundings, or be superimposed)?
- Will you use multiple light sources or a single glow?
Planning effectively now saves you editing headaches later.
4. Tools & Software Overview
You’ll typically use a combination of AI tools, image editors, and compositing software. Below are categories and examples:
| Purpose | Tools / Software | Notes / Why Useful |
| AI generation of glowing elements | Midjourney, Stable Diffusion with prompts, Leonardo AI, DALL·E, ControlNet variants | You can generate custom glowing shapes or overlays |
| Image editing & compositing | Adobe Photoshop, Affinity Photo, GIMP, Procreate | Essential for masking, blending, color work |
| Light & relighting tools | Luminar AI, Luminar Neo (Glow / Magic Light tools) , Clipdrop Relight | Especially for adding or adjusting ambient glow |
| Brushes, overlays & textures | Flame brushes, smoke textures, light leak overlays | For manual enhancement and realism |
| Masking / selection tools | Photoshop’s Select & Mask, layer masks, pen tool | Accurate cutouts and blending |
You don’t need all of these. Even just: base photo + Photoshop + one AI generator + glow overlays can get you a powerful result.
5. Step-by-Step Workflow
Here is a detailed workflow you can follow and adapt to your tools.
a) Choosing the Right Base Photo
- Pick a clean, high-resolution image.
- Prefer images where the subject’s hands or parts are exposed if you want the glow to originate from there.
- If possible, use a version with high dynamic range or RAW format so shadows and highlights retain detail.
b) Masking & Selections
- Duplicate the background layer as a working copy.
- Use selection tools (Quick Selection / Pen Tool / Lasso) to isolate the subject or the region where glow will appear.
- Create clean masks so glow elements don’t harshly cut across edges.
- Feather mask edges (2–10 px depending on resolution) for smooth blending.
c) Generating Light / Glow Shapes with AI
This is where you bring in AI help. Here are approaches:
Method 1: Prompting for glow overlays
- Use a text-to-image AI (eg. Stable Diffusion) to generate glowing shapes with transparent background or dark background.
- Prompt example: “Golden fiery glowing shape / energy arc, on dark background, transparent PNG style.”
- Generate multiple versions; pick ones with good contrast and shape variety.
Method 2: ControlNet + edge maps / scribbles
- Use ControlNet models (e.g. Canny, scribble) to guide the AI to follow a shape you want.
- Draw a rough path on a blank canvas, feed it to ControlNet, prompt it to generate a glowing energy line along the path.
- This gives more control over shape orientation.
Method 3: Generative brushes / tools
- Some AI art tools or plugins support “light brushes” or “glow paint” modes.
- You can paint directly in AI canvas and export as overlay.
Once you have glow overlay(s), export them (preferably as PNG or transparent format) for compositing.
d) Integrating Glow Shapes into the Photo
- Import the glow shape layer(s) into your main editing file, above your subject layers.
- Set blending mode of glow layers to Screen, Add / Linear Dodge, or Lighten depending on your software. This ensures dark parts drop out.
- Use transform tools to scale / rotate / skew the glow shapes, matching perspective/direction.
e) Color, Blend Modes & Light Painting
- Use Hue/Saturation or Color Balance to shift the glow’s color (more golden, orange, white).
- Duplicate glow layers and apply Gaussian Blur to duplicated ones to soften outer glow (see Photoshop glow technique) .
- Use Layer Masks to hide parts of glow that intersect poorly (e.g. behind objects).
- On a new layer (set to Overlay, Soft Light, or Linear Light), paint with soft brushes (low opacity) in glow color near edges to simulate light reflecting on the subject or background.
- Add gradient overlays or radial gradients behind the glow to emphasize the light source.
f) Refinement & Details
- Zoom in and refine edges; ensure no harsh seams.
- Add small spark or particle elements (light specks, embers) around the glow to make it feel alive.
- Use Curves / Levels to adjust contrast.
- Consider vignettes to draw the eye toward the glow region.
- Use noise / grain lightly to unify the glow with the photo’s texture.
After you polish, flatten or export in high quality.
6. Advanced Tips & Tricks
- Light casting: To make glow look integrated, let it cast colored light onto nearby objects or skin. Use masked brush work or clipping masks for that.
- Depth variations: Use multiple glow layers at different blur radii and opacities to simulate depth.
- Motion blur: If you want dynamic energy, apply very slight motion blur (in direction of glow path).
- Wisp transitions: Let parts of the glow fade into smoke / mist at edges — use soft brushes and masks.
- Gradient mapping: Use gradient maps to control how color transitions across glow.
- Relighting the photo: Use AI relighting tools (for example, Clipdrop Relight) to tweak ambient lighting to match glow direction .
- Masking edges with luminance masks: Use luminosity masks so the glow only shows where it’s brighter than background.
- Use HDR / 32-bit editing for high dynamic range work if possible.
7. Common Mistakes & How to Avoid Them
| Problem | Why It Happens | Fix / Avoidance |
| Glow looks pasted or flat | No color interaction with surroundings | Add light casting / colored highlights |
| Harsh edges | Overlay shapes not masked or feathered | Always soften edges / use masks |
| Glow clipping or blown out | Overexposed glow region | Lower opacity, use multiple weaker glow layers |
| Mismatched perspective | Glow not aligned with subject’s pose | Transform and skew glow to match perspective |
| Lack of depth | Only single glow layer | Use multiple layers with different blur and opacity |
| Color clashes | Glow hue clashes with ambient photo tones | Use Complementary or analogous colors, color balance |
8. Prompts & Examples for Popular AI Generators
Here are sample prompt templates you can adapt:
For ControlNet guided generation
- Draw a curved path in a sketch or line, then feed it to a ControlNet model (scribble or Canny).
For hybrid / multi-prompt approach
- Generate several glow variations (small arcs, wide swirls, particles).
- Composite best parts manually.
Example settings tips
- Use “transparent background” or “PNG overlay style” in prompt.
- Include keywords like “glow,” “radiant,” “luminescent,” “energy,” “fiery,” “embers.”
- Use “high detail,” “HD,” “8K” to encourage sharper output.
Adapting prompts often through trial and error is normal.
9. Workflow Examples / Case Studies
Case Study 1: Portrait with Energy Orb in Hand
- Selected portrait with open palm.
- Masked hand and subject.
- Generated multiple glowing orb / flame overlays.
- Composited orb shape above hand, blending mode “Linear Dodge.”
- Painted light reflections on fingers and face.
- Final touches: spark particles, color grading.
Case Study 2: Silhouette with Fiery Wings
- Took a backlit silhouette image.
- Masked the silhouette.
- Generated wing-shaped glowing energy overlays.
- Composited behind subject, masked overlaps.
- Applied glow and radial gradient behind.
- Added subtle embers and smoke trails.
These examples illustrate that you can adapt the same core workflow to different creative visions.
Prompt for Photo:
Here is link for All Photos Click Here
10. SEO & Sharing Strategies
To maximize visibility, use these SEO & content strategies:
- Keyword usage: include variations like “AI glowing photo tutorial,” “fiery glow overlay,” “light energy effects” in headings and body.
- Include alt text & images: publish your glowing photos with optimized alt text (“Golden glowing energy arc over male portrait”).
- Show process images: step thumbnails (before, masking, glow overlays, final) engage readers.
- Embed AI generation prompts / downloadable overlays: offering downloadable PNG overlays or prompt sets encourages sharing/links.
- Social media teasers: share short reels or GIFs of before/after on Instagram, TikTok — link back to full post.
- Cross-link: link this tutorial in related posts (e.g. “15 AI Portrait Effects”) to improve site linking structure.
- Use long-tail keywords: e.g. “how to add fiery glow in portraits with AI,” “create glowing shape overlays for photos.”
11. Conclusion
Creating AI fiery glowing shape photos is a beautiful intersection of creativity and technology. With a strong concept, a reliable workflow, and some patience for experimentation, you can produce images that captivate and amaze.
Remember:
- Plan your composition and light direction
- Use AI to generate glow overlays, but don’t rely on it fully
- Blend, refine, and lightpaint to integrate glow realistically
- Don’t be discouraged by trial and error — glow effects often need tweaking
For More Information Visit


